Loading...
bvsmp.com
Click to copy IP
Welcome to the Official Wiki for Bone Voyage
You can find any information you need regarding the multiple systems this server has to offer here, or optionally you can do the following command in game for a quick recap of the server's features and commands!
Command: /warp Tutorial

➤ Rule 1: No Bullying, Harassment, Bigotry, or Other forms of Hateful/Provocative Communication - This also includes, but is not limited to religious, political, and other forms of conversation which may disrupt communication/otherwise offend users.
➤ Rule 2: No Using Hacked Clients, Hacks, X-Ray Texture Packs, or Other Third-Party Tools which may provide an unfair advantage over other players/disrupt gameplay in any way.
➤ Rule 3: No advertising, spam, or attempted poaching of players/staff through means of in game or out of game communication.
➤ Rule 4: The plugins and core game functions are there for a reason - they are meant to set boundaries so we do not have to set them in the rules. No exploiting of any kind, whether it is base game, plugin mechanics, or otherwise.
➤ Rule 5: No sharing or requesting personal information, whether in game or out of game, is allowed. Additionally, threats or jokes regarding doxxing, leaking of personal information, or otherwise are strictly prohibited.
➤ ʀᴜʟᴇ 6: These rules are subject to change at any time and by playing - you agree to said rules and any changes that may occur in perpetuity.
➤ Notice: Punishments and infractions are not limited to this ruleset - Staff reserve the right to hand out warnings/punishments for unlisted infractions at any time to any player that they deem is in violation of server rules, both written or unwritten. This is not a stipulation made for staff to abuse their powers and ban users they do not like - this is here in the event that a rule/ruleset is not covered/for extenuating circumstances. As long as the above rules are followed, users do not attempt to circumvent rulesets using loopholes, users are not attempting to harm the server or its player base, and are maintaining respectful communication, then this notice should be of no concern.
Getting Started
Getting started in Bone Voyage is extremely simple and should only take you a few moments. Of course, there are a plethora of features which can take you much longer - but if you wish to simply survive, build, and thrive, you can follow the steps below!
1.) Read the introductory signs- Not only do they outline expected server conduct, but provide useful information about the server & getting started.
2.) The Main Menu: You will have a Bell Item Called “Main Menu”. Right click to use this and if you lose it, you can claim a new one at the spawn Main Menu NPC.
3.) Do /kit claim and /kit starter: These two commands will give you starting armor, a weapon, blocks, and the tools needed to claim your first piece of land.
4.) Explore the Spawn: Inside and around spawn, we have the player markets/admin shops, multiple quests and job NPCs, an AFK room, and so much more. Take the time to acquaint yourself!
5.) To Head into The Wilds, do /RTP: When you are ready to claim your first plot of land or get out into the wilds around the city, you can do /rtp or use the NPC at spawn!
6.) Find Your Plot, Claim Your Home: With the Claim Tool in Hand (The Golden Hoe), you can right click one corner, then the opposite corner to begin claiming your chunks. Follow the on screen prompts to claim your land. If you have any trouble claiming, you can visit the Land Claiming QuickStart Section for more info.
7.) The Tutorial Ship: If you want to update yourself on the mechanics briefly without jumping deep into long, in depth wiki pages - you can type /warp tutorial to look through our abbreviated tutorial ship
You are now ready to begin the basics of playing and surviving in Minecraft - if you are interested in learning more about server specific features and things you can do to enhance your gameplay even further, continue through this wiki to learn more!
Teleportation Commands
Teleportation is an essential feature in Bone Voyage. Whether its to get to new places, meet up with friends, or otherwise, this guide will detail below all of the common teleportation commands
/sethome [name]
/home [name]
/tpa [player name]
/tpah [player name]
/tpaccept [player name]
/rtp
/warps
/warp [warp name]
/spawn
Other teleportation commands exist, but are in their associated plugin documentation. Please read the supporting documentation to learn how to teleport with Skyblock, Lands, and More…
Supporter Tutorials
Supporter Commands
Sign & Chat Formatting
Both signs and chat can be formatted with cool colors and formats to make them pop out - below is a list of things you can add to said signs or chats
| Suffix | Color codes | |
|---|---|---|
magic (group) |
&k |
|
rgb |
&#RRGGBB |
|
black |
&0 |
|
dark_blue |
&1 |
|
dark_green |
&2 |
|
dark_aqua |
&3 |
|
dark_red |
&4 |
|
dark_purple |
&5 |
|
gold |
&6 |
|
gray |
&7 |
|
dark_gray |
&8 |
|
blue |
&9 |
|
green |
&a |
|
aqua |
&b |
|
red |
&c |
|
light_purple |
&d |
|
yellow |
&e |
|
white |
&f |
|
bold |
&l |
|
strikethrough |
&m |
|
underline |
&n |
|
italic |
&o |
|
reset |
&r |
Mystery Cosmetic Crates + Keys
Mystery crates and keys range from Tiers 1-5. As you go from lower to higher tiers, your chance of getting rarer items increases
Mystery Dust
Not to be confused with mystery dust from custom enchanting, this mystery dust can be used to craft even more cosmetic mystery boxes
To craft this mystery dust, just go to one of the mystery vaults at /warp cosmetics, then at the bottom right click the anvil.
Land Claiming Tutorials
Notice: This tutorial is a direct copy of the official lands plugin's tutorial page. If you would prefer to view said wiki, you can here
Claiming
Creating your own claim is really easy. You can either claim individual chunks or areas using the selection mode.
General
Just executing /lands claim will claim an initial area for you with your players name as the land name.
Selection
The selection mode allows you to claim large areas with ease. Just execute /lands selection, select both corners by just clicking, and execute /lands claim.
Management
You can manage your land in the menu by executing /lands or by using the commands. To see a list of available commands,
just execute /lands help.
Multiple Lands
If you're part of multiple lands, you can decide for which land commands are executed, by executing the /lands edit <land> command once.
Trust Players
Command: /lands trust <player> [area]
Untrust Players
Command: /lands untrust <player> [area]
Toggle Permissions for Players
Promote / Demote Players
Video
The following video shows the basics of Lands.
Current Edit Land
Most commands don't require you to provide the name of a land or nation. Commands are usually executed for the land that you selected via /lands edit <land>.
/lands edit <land>
Player Commands
/lands
/lands menu [menu] [additional]
/lands help [page]
/lands create <name> <tag>
/lands createcamp <name>
/lands delete <land | here>
/lands selection
Create a selection by selecting a lower and upper corner. Executing /lands selection expand will expand the selection to the full height. When complete, you can execute the following commands for the selection:
/lands claim [radius, auto, fill]
If no argument provided, it claims the chunk you're standing in.
/lands claimlist
/lands unclaim
/lands assign <area>
/lands merge <land>
/lands relations
/lands deposit <amount> [land]
/lands withdraw <amount> [land]
/lands balance [land]
/lands trust <player> [area]
/lands untrust <player> [area]
/lands ban <player> [area] [silent]
/lands unban <player> [area]
/lands setrole <player> <area | *> <role>
/lands setowner <player>
/lands accept <land>
/lands deny <land>
/lands level
/lands invites
/lands leave <land | here>
/lands chat [land] <message>
/lands taxes
/lands upkeep
/lands info [land]
/lands player <player>
/lands map
/lands rename <name>
/lands setspawn
/lands spawn [land]
/lands list
/lands storage
/lands view
/lands unstuck
/lands rent
/lands confirmtp
Confirm an unsafe teleport destination.
Nations
/nations menu
/nations create [name]
/nations delete
/nations rename <name>
/nations setcapital
/nations relations
nations trust <land>
/nations untrust <land>
/nations accept <nation>
/nations deny <nation>
/nations leave
/nations spawn
/nations chat [nation] <message>
/nations info [nation]
/nations level
/nations list
Wars
/wars menu
/wars declare <land | nation>
/wars deny
/wars info
/wars spawn
/wars list
Land Chat
The easiest way to chat with land members is by just sending a message in the normal chat with the following format: @land <message>
If you want to send a message to a specific land, just add the land name before the message: @land <land> <message>
Examples:
Alternative Command
If you want to send messages using a command, just execute /lands chat [land] <message>.
Nation Chat
The easiest way to chat with nation members is by just sending a message in the normal chat with the following format: @nation <message>
If you want to send a message to a specific nation, just add the nation name before the message: @nation <nation> <message>
Examples:
Alternative Command
If you want to send messages using a command, just execute /nations chat [nation] <message>.
Subareas are inside a land. These areas are three dimensional. That means that they are not bound to chunks, but instead to blocks. You can trust players to specific areas and apply flags to them, like you would do for a land. The land also has a default area which contains every block that isn't part of a subarea. This is the area that you're normally modifying in the menu of your land.
Create a new Area
1. First open your land menu with /lands menu and click on the areas item.
2. Now click on the add area button. After this you will need to enter the area name in chat.
3. After that you will notice that the area will popup in the menu and give you instructions on how to set select the boundaries of the area.
4. The selection is set. It will display it to you live. You can make changes as you wish. Then just execute /lands selection assign <area>. After that everything is setup. The GUI menu of the area can be opened via /lands or by standing inside it and executing `/lands menu here`.\
Trust Players and set Flags
By opening the areas menu and clicking on the area, you can trust players to this specific area and edit flags. You can do everything for this specific area, just like for the default area.
Areas can be setup for rental or to be purchased via the GUI menu or by using a sign. The setup via the GUI menu is recommended, but both ways result in either a sign or a hologram, which players can use to rent or purchase.
Menu
When the Setup is Done
The rent or sell sign or hologram is setup and users can now access it.
Rent & Extend Time
To rent a area, just click on the sign or hologram. To add more time to your rental, just click again on the sign or hologram.
Purchase an Area
Just click on the sell sign or hologram.
Browse Listings
Use /lands rent list to view all areas and lands that can be rented or bought. There you can also filter and sort these offers.
Cancel Rental
Tenants can use /lands rent cancel to cancel their rental while standing inside the area.
Remove the Rental
As the area owner you can either remove the sign or execute /lands rent remove while standing inside the area.
Remove Tenant
You can remove tenants by executing /lands rent remove tenant. This may require you to pay a compensation fee to the tenant.
Signs
An alternative way to setup areas for rental, is by using signs. However, the menu alternative is recommended, since it's just easier.
Rent Sign Setup
Rental signs can only be created in subareas. Whole lands can only be sold.
You can only set up sub areas for rental. The default area can only be set up for sale (= selling the whole land; more information below)
Example: The following example lets players rent the area for a maximum of 30 days. They can expand their rental for $1000 for every 7 days until they have accumulated a maximum time of 30 days.
Sell Sign Setup
Sell signs can be placed in sub areas and in the default area (= selling the whole land).
Example: The following example lets players buy the area or land (if placed in the default area) for $5000.
What is a Nation?
A Nation is a collection of lands. A landowner can create a nation by executing /nations create <name>. This land will be the capital of the nation. Once the nation is created, the nation can invite other lands to join them.
Allowing Nation Members
You can allow all players that are part of the same nation to do specific actions in the land, by toggling flags of the nation role, which can be found in your land menu.
Land and Nation Upkeep
Lands that are part of a nation will no longer pay upkeep to the server, but instead to the nation they're part of. The nation, however, can configure how much upkeep lands of their nation need to pay to them. Also, the nation needs to pay upkeep to the server. That means that setting an upkeep on their lands may be crucial to pay the upkeep costs for the nation to the server. The nation can configure the upkeep on the lands in their nation menu. The nation menu can be opened by executing /nations. If you're part of multiple lands, and you want to edit a different nation, execute /lands edit <land> to let the /nations command be executed for the nation of this specific land.
Nations in Wars
Nations can declare war against other nations or lands, by executing /wars declare <land or nation>. All lands in the nation will fight in this war. If a player is part two of lands that are not in the same nation, the player will join the team in which they are part of the most lands. In this case, lands they own will be prioritized. Depending on your server's configuration, a single land can also declare war against a whole nation.
Nation Levels
A nation can level up by various factors which depend on your server's setup. Levels will reward you and your nation lands with more claims and other benefits. You can view the level of your current nation by executing /nations level.
1. Declare War
2. War Preparation Time
After the declaration is sent, the war preparation time starts. During this time, the defender has time to prepare against for the upcoming fight. All players of both lands will get a notification periodically. By executing /wars info or /wars, you can get information about the upcoming war.
3. The War Starts
When the war preparation time is over, all players of both lands are able to fight against their enemy. By executing /wars menu you can view which actions, like block breaking etc., you can do in the enemy's lands.
3.1 What Happens if a Player is Part of Multiple Lands? Which Team Will They Join?
Defending lands are prioritized and the team is calculated once and stays the same.
3.2 Allies
Direct allies (a land or lands of a nation) will be able to support you in your war. They'll also be visible in the /wars menu. They also can be attacked by the enemy.
4. During the War
During the wartime, you may be able to invade the enemies land and steal items from their containers. You may even be able to break and place certain or all blocks depending on if it is allowed (Currently stealing/block destruction is disabled).
4.1 Capture Flags
Capture flags can be crafted or are given to you by the server. You can view the crafting recipe during the war in the /wars menu. You must place them in the outskirts of the enemy's land. After that, you must clear all enemy presence in this area and hold the capture point for a specific time. You'll be able to view a progress bar at the top of your screen. Be aware that the defenders get notified once you place a capture point!
5. The War is Over
The team with the most points wins the war.
In Game Currencies
Bone voyage has three in game currencies - Gold Shillings, Vote Coins, & Points. Below is a list of their uses and how they interact. In no way can these currencies be bought or gamed with real life currency.
Gold Shillings
Gold Shilling Commands
Vote Coins
Vote Coin Commands
Points
1.) Voter Premium: This gives the player double the rewards (excluding vote coins and points) from voting on the server.
2.) Auction House Upgrades: You can upgrade the total amount of auctions you can create
3.) Crate Keys: Points can also be exchanged for crate keys. These keys then allow you to open one of the many crates we have for a chance at a multitude of items including gear, spawners, xp, gold shillings, and more. For more information on these please refer to the Crates wiki page.
Points Commands
The Different Shop Types
Players have the ability to either buy/sell basic goods to the main admin shop or can create/use various player-oriented shops. Below are a list of these markets and how to use them.
Admin Shop
The admin shop is the basic shop in the aforementioned explanation where the most basic items can be bought and sold.
Chest Shops
This is the first of three player based markets players can use to sell their items to others. Players can set up chests, whether in their home or in the rentable spawn regions, to sell goods to others.
Setting Up a Chest Shop
Buying from a Chest Shop
Players can buy from a chest shop by either...
Chest Shop Limitations
Orders
If you cannot find an item on any of the shops and are in need of it, you can make what is called an order.
Placing an Order
Filling an Order
Auction House
This is the final player market type. While many of its functionalities are covered by the order and chest shop systems, it is primarily there for users wanting to auction off items; Usually those that are custom or rare in value.
Auction House Commands
Upgrading Your Total Auctions
Voting
Voting currently gives players the ability to earn amazing rewards while also helping to promote the server. It is an integral part of the server's ability to get new players - so we found it fitting to make the rewards just as special!
How to Vote
Rewards for Voting
When you vote you will receive money, experience points, one vote coin, and one vote key. As you descend the list of voting websites, you will gradually receive more money per vote.
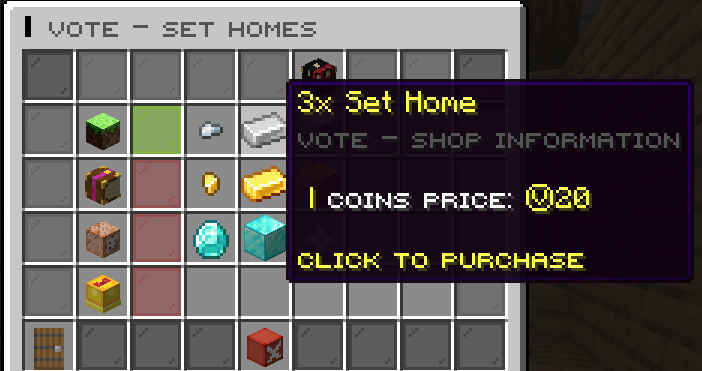
Vote Shop
The voteshop is where players can spend their hard earned vote coins to buy useful upgrades such as kits, extra set homes, and exchange vote coins for points!
Voter Premium
Voter premium is an upgraded version of voting. In exchange for points, players can activate said voter rank and receive 1.5x money and 2x rewards for one month.
Voting Milestone
As you and the server vote more, you will receive the ability to unlock both personal and global milestones. These reward players with experience, in game currency, and much more!
Voting Parties
After a certain number of players vote, a special "party" will activate. This will give all online players a collection of rewards for reaching the vote party goal.
Reward Crates
Reward crates, which can be found at /warp crate, are crates which provide players with a chance to receive a plethora of items ranging from spawners, experience points, in game currency, gear upgrades, and much more.

How to Open Reward Crates
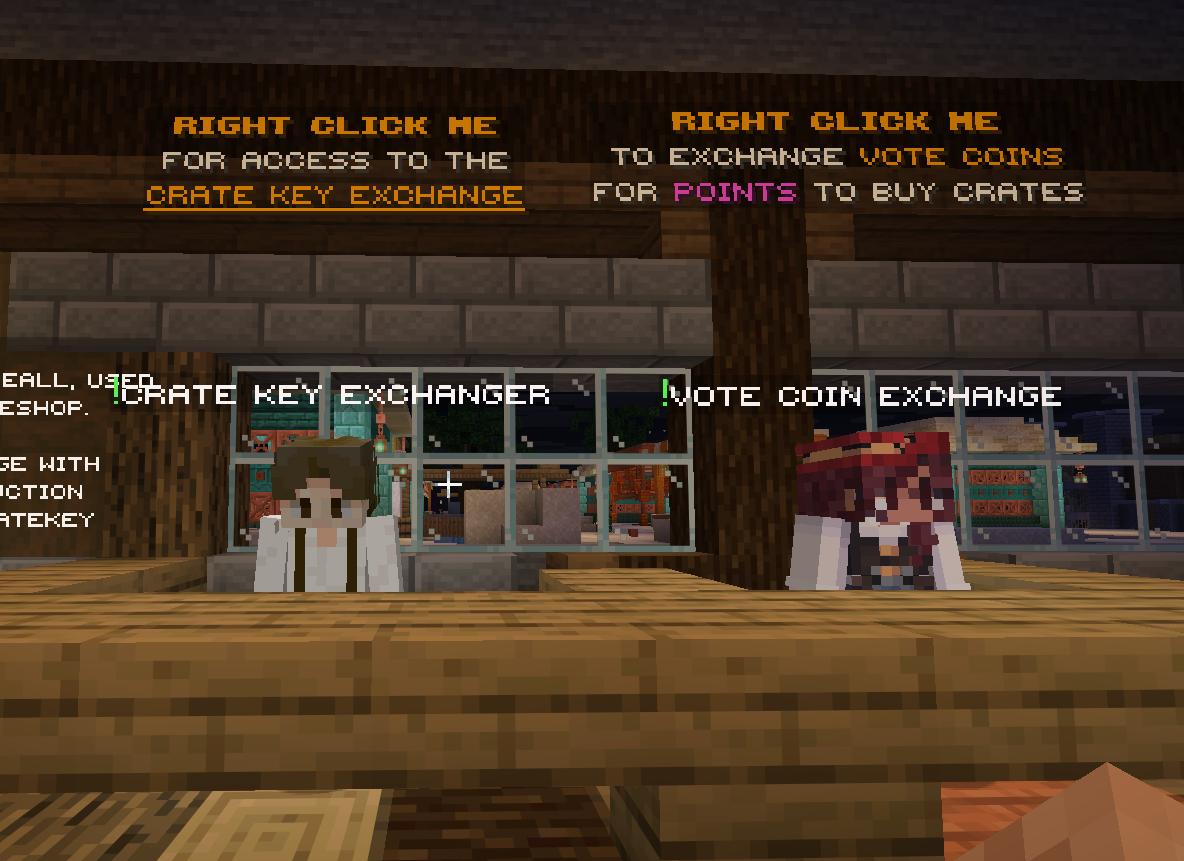
Vote Crates: The keys for vote crates are either earned from daily voting or by purchasing them from the Crate Key Exchanger NPC for points.
Daily Crates: Daily crates are unlocked by completing daily quests (/dq) or by purchasing them from the Crate Key Exchanger NPC for points.
Monthly Crates: These crate keys can only be obtained from the Daily Crate with a 1/30 chance.
All Other Crates: These crate keys can only be obtained by purchasing them from the Crate key Exchanger NPC for points or by receiving them from the aforementioned crates as drops.
Skyblock Quickstart
Getting started in skyblock is relatively easy and fast - allowing you to quickly make your own island and begin building up your own personal plot outside of the main world.

Enchanting
Obtaining Custom Enchanting Books & Items
You can get custom enchanting books and items by either
How to Enchant
How to Prevent Enchanting Failure/Item Destruction
Tinkering
If you decide that you need to get rid of some books, you can use the tinkerer menu to trade in said books for experience and magic dust of the same tier
Alchemist
If you decide that you need to upgrade some magic dust or books, you can use the alchemist menu to trade in...
To access the tinkering menu, do /alchemist
List of Enchantments
| Enchantment | Description | Applies to | Rarity | Max Level |
|---|---|---|---|---|
| Enchantment | Description | Applies to | Rarity | Max Level |
| Abiding | Weapons with this enchant become unbreakable | Weapons | Legendary | 1 |
| Aegis | Chance to gain speed when taking fall damage. | Boots | Ultimate | 3 |
| Allure | Your attack pulls mobs towards you. | Swords | Elite | 3 |
| Ambit | Damages mobs within a radius that increases with the level of enchant. | Swords, Axes | Ultimate | 7 |
| Angelic | Heals health when damaged. | Armor | Ultimate | 5 |
| Auto Reel | Automatically reels in the fishing rod when it gets a bite. | Fishing Rods | Ultimate | 4 |
| Aqua | Deal double damage while in water. | Boots | Legendary | 4 |
| Aquatic | Breathe underwater. | Helmets | Simple | 1 |
| Archer | Increases damage dealt with bows. | Bow | Ultimate | 4 |
| Armored | Decreases damage from enemy swords by 2% per level. | Armor | Legendary | 4 |
| Arrow Break | Chance for arrows to bounce off you while holding item with this enchant. | Axe | Ultimate | 6 |
| Arrow Deflect | Chance to prevent enemy arrow from dealing damage. | Armor | Ultimate | 4 |
| Axe of Spirits | Chance to get more souls from killing players. | Axes | Fabled | 3 |
| Bait | Chance to receive double fishing drops. | Fishing Rod | Legendary | 3 |
| Barbarian | Chance to inflicts more axe damage. | Axes | Legendary | 4 |
| Beastslayer | Increases damage dealt to Hostile Mobs. | Swords, Axes | Legendary | 4 |
| Berserk | Chance of strength and mining fatigue. | Swords, Axes | Unique | 5 |
| Blacksmith | Repair your weapon in exchange for dealing less damage. | Axe | Legendary | 5 |
| Bleed | Make your opponent bleed. | Axes | Ultimate | 6 |
| Blind | A chance of causing blindness when attacking. | Swords | Elite | 3 |
| Block | A chance to negate an attack and deal up to 4 damage back. | Swords | Ultimate | 3 |
| Blunt Force | Chance to strike with great force. | Axes | Elite | 4 |
| Bone Crusher | Increases damage dealt to Skeletons. | Swords, Axes | Simple | 3 |
| Bowmaster | Multiplies damage against players who are wielding a Sword at the time they are hit. | Bow, Crossbow, Trident | Elite | 5 |
| Carrot Planter | Plant carrots in a 3x3 area by shift+right-clicking. | Hoes | Simple | 3 |
| Chaos | Deal weakness and wither effects. | Trident | Legendary | 5 |
| Chunky | Chance to receive less damage. | Chestplates | Legendary | 6 |
| Cleave | Damages players within a radius that increases with the level of enchant. | Axes | Ultimate | 7 |
| Confuse | Chance to give nausea effect. | Swords | Ultimate | 4 |
| Convulse | Chance to throw your attackers into the air. | Boots | Legendary | 6 |
| Creeper Armor | Chance to be immune to explosive damage, at higher levels you have a chance to heal. | Armor | Ultimate | 3 |
| Critical | Increase damage done with critical hit. | Swords | Elite | 3 |
| Curse | Chance to give your enemy mining fatigue. | Armor | Elite | 2 |
| Deadshot | Headshots with tridents deal double damage. | Trident | Legendary | 5 |
| Death Punch | Increases damage dealt to Zombies. | Swords, Axes | Simple | 5 |
| Decapitation | Chance to have opponents head drop on death. | Swords, Axes | Simple | 3 |
| Deranged | Strike lightning at nearby players. | Swords | Legendary | 3 |
| Devour | Chance to restore food while killing mobs. | Weapons | Unique | 3 |
| Diminish | Chance to give your enemy mining fatigue. | Axes | Ultimate | 1 |
| Diploid | Chance to multiply mob drops. Costs 5 souls / activation. | Swords | Fabled | 5 |
| Disappear | Chance to become invisible when low on health. | Armor | Ultimate | 4 |
| Disarm | Chance to disarm opponent. | Swords | Fabled | 3 |
| Disarmor | Chance of unequipping random armor piece from your opponent. | Sword | Legendary | 8 |
| Disintegrate | Chance to deal extra durability damage to all enemy armor with every attack. | Swords | Ultimate | 4 |
| Distance | Chance to distance yourself from your enemies and gain regeneration. | Weapons | Ultimate | 4 |
| Divert | Chance of poisoning opponent and gaining regeneration. | Armor | Legendary | 5 |
| Dodge | Chance to dodge physical enemy, chance increases when sneaking. | Armor | Ultimate | 5 |
| Double Strike | A chance to strike twice. | Swords | Legendary | 3 |
| Ender Slayer | Increases damage dealt to Enderman and Ender dragons. | Weapons | Elite | 5 |
| Endmaster | Double damage to mobs in End. | Swords | Ultimate | 3 |
| Epicness | Display particles on attack. | Swords | Simple | 3 |
| Exalted | A chance of removing bad potion effects. | Swords | Ultimate | 4 |
| Experience | Chance to get more experience from ores. | Tools | Simple | 5 |
| Explosive | Chance for arrows to explode. | Bow | Unique | 5 |
| Explosive Demise | Summon creepers as your guards when near death. | Leggings | Unique | 8 |
| Extinguish | Chance to extinguish yourself when on fire. | Leggings | Elite | 3 |
| Famine | A chance to give your opponent the hunger effect. | Weapons | Unique | 4 |
| Featherweight | Chance to get a burst of haste. | Swords, Axes | Unique | 3 |
| Forcefield | Chance to push away your opponent. | Swords | Simple | 5 |
| Frenzy | Chance for arrows to explode. | Crossbow | Unique | 5 |
| Frozen | Can cause slowness to attacker when defending. | Armor | Elite | 3 |
| Fire Hook | The hook is on fire. | Fishing Rod | Elite | 3 |
| Fuddle | Disorganize opponent's hotbar. | Swords | Ultimate | 3 |
| Fumble | Chance to explode enemy when hit by their arrows. | Chestplate | Legendary | 3 |
| Gears | Added speed when equipped. | Boots | Legendary | 3 |
| Glowing | Gives permanent night vision. | Helmet | Simple | 1 |
| Greatsword | Multiplies damage against players who are wielding a Bow at the time they are hit. | Sword | Elite | 5 |
| Guardians | A chance to spawn iron golems to assist you and watch over you. | Armor | Ultimate | 10 |
| Hardened | Chance to recover durability when damaged by players. | Armor | Legendary | 3 |
| Haste | Allows you to swing your tools faster. | Tools | Fabled | 3 |
| Hasten | Chance to gain Haste after breaking blocks. | Tools | Simple | 3 |
| Heavy | Decreases damage from enemy bows by 2% per level. | Armor | Ultimate | 5 |
| Hellfire | Arrows turn into fireballs. | Bow | Ultimate | 5 |
| Hook | Get more exp from fishing. | Fishing Rod | Elite | 3 |
| Hook | Chance to increase luck while fishing. | Fishing Rod | Ultimate | 3 |
| Hunter | Increases damage dealt to Passive Mobs. | Bow, Crossbow, Trident | Unique | 4 |
| Ice Aspect | A chance of causing the slowness effect on your enemy. | Swords | Ultimate | 3 |
| Immolate | Increases damage dealt to Spiders. | Swords, Axes | Elite | 3 |
| Immolation | Set all mobs in radius on fire. | Swords | Ultimate | 3 |
| Immortal | Chance to prevents your armor from taking durability damage. | Armor | Fabled | 4 |
| Impact | Chance to double dealt damage. | Trident | Elite | 4 |
| Implants | Chance to restore food every few seconds. | Helmets | Ultimate | 3 |
| Infernal | Explosive fire effect. | Swords, Axes | Elite | 3 |
| Inflame | Set all players in radius on fire. | Axes | Legendary | 3 |
| Inquisitive | Chance to increase EXP drops from mobs. | Swords | Legendary | 4 |
| Interrupt | Chance to give your enemy mining fatigue. | Swords | Ultimate | 2 |
| Jelly Legs | Chance to negate fall damage. | Boots | Ultimate | 3 |
| Judgement | Chance of poisoning opponent and gaining regeneration. | Elytra | Legendary | 5 |
| Kill Aura | Chance to kill multiple\nmonsters in radius. | Swords | Legendary | 5 |
| Launch | Launch yourself by right-clicking. | Swords | Legendary | 3 |
| Lava Walker | Walk on Lava. | Boots | Legendary | 1 |
| Lifesteal | A chance to steal health when attacking. | Swords | Legendary | 5 |
| Longbow | Greatly increases damage dealt to enemy players that have a bow in their hands. | Bow | Ultimate | 4 |
| Lucid | Chance to cure blindness and gain night vision when hit. | Armor | Legendary | 3 |
| Magnet | Your attack pulls players towards you. | Swords | Elite | 3 |
| Marksman | Increases damage dealt with Crossbows. | Crossbow | Elite | 4 |
| Missile | Arrows turn into fireballs. | Crossbow | Elite | 5 |
| Molten | Chance of setting your attacker ablaze. | Armor | Unique | 4 |
| Momentum | Chance to gain speed boost with fireworks. | Elytra | Elite | 3 |
| Multiplication | Chance to multiply ore drops. Costs 5 souls / activation. | Pickaxe | Fabled | 5 |
| Nether Slayer | Increases damage dealt to nether mobs. | Weapons | Elite | 5 |
| Netherling | Double damage to mobs in Nether. | Swords | Ultimate | 3 |
| Neutralize | Chance to disarm opponent. | Bow, Crossbow | Fabled | 2 |
| Night Owl | Deal more damage to mobs at night. | Swords | Ultimate | 1 |
| Nightwalker | Freeze mobs at night. | Swords | Elite | 3 |
| Nulify | Chance to reflect attack and multiply damage. Costs 40 souls / activation. | Leggings | Fabled | 3 |
| Obsidianshield | Gives permanent fire resistance. | Armor | Ultimate | 1 |
| Overload | Unlocks additional hearts. | Armor | Legendary | 3 |
| Paralyze | Gives lightning effect and a chance for slowness and slow swinging. | Swords, Axes | Elite | 4 |
| Patch | Chance to recover durability when damaged by mobs. | Armor | Legendary | 3 |
| Perish | A chance to give the wither effect. | Bow, Crossbow, Trident | Unique | 5 |
| Permafrost | Chance slow and bleed opponents. | Swords | Ultimate | 5 |
| Phoenix | Chance to revive yourself when killed. | Chestplates | Fabled | 3 |
| Piercing | Inflicts more damage. | Bows | Ultimate | 5 |
| Planter | Plant seeds in a 3x3 area by shift+right-clicking. | Hoes | Ultimate | 3 |
| Plummet | Deal damage to nearby mobs when taking fall damage. | Boots | Ultimate | 3 |
| Poison | A chance of giving poison effect. | Swords, Axes | Elite | 3 |
| Poisoned Hook | Poisons the hook. | Fishing Rod | Elite | 3 |
| Poisoned | Chance to give poison to your attacker. | Armor | Elite | 4 |
| Poseidon | Increases damage dealt with Tridents. | Trident | Elite | 4 |
| Potato Planter | Plant potatoes in a 3x3 area by shift+right-clicking. | Hoes | Simple | 3 |
| Ragdoll | Chance to be pushed back when getting hit. | Armor | Ultimate | 4 |
| Ravenous | Chance to regain hunger while fighting. | Swords, Axes | Unique | 4 |
| Reaper | A chance to give your opponent the Wither and Blindness effects while dealing damage | Axe | Elite | 4 |
| Rebound | Gain some health back after kills. | Weapons | Legendary | 3 |
| Rebreather | Chance to regain air when mining under water. | Pickaxe | Simple | 2 |
| Reflect | Absorb enemy damage and reflect it back. | Armor | Unique | 5 |
| Reforged | Protects weapons and tools durability, items will be take longer to break. | Weapons and tools | Elite | 10 |
| Reinforced | Reduces damage dealt to you. | Elytra | Ultimate | 4 |
| Replanter | Replants crops when harvested | Hoes | Unique | 1 |
| Replenish | Chance to restore food while mining. | Pickaxes | Elite | 3 |
| Restore | Upon breaking, item has a chance to lose this enchantment and repair half of its durability. | Tools | Fabled | 4 |
| Rocket Escape | Blast off into the air at low HP. | Boots | Elite | 3 |
| Rush | Chance of speed boost when taking off with elytra. Costs 10 souls / activation. | Elytra | Fabled | 3 |
| Safeguard | Chance to gain Damage Resistance when defending. | Armor | Ultimate | 2 |
| Scare | Chance to replace your opponents helmet\nto a pumpkin for a short time. | Weapons | Fabled | 5 |
| Shatter | Chance to deal extra durability damage to all enemy armor with every attack. | Axes | Ultimate | 4 |
| Sharpness Hook | Deal damage with the hook. | Fishing Rod | Ultimate | 1 |
| Shockwave | Chance to push back your attacker when your health is low. | Chestplates | Elite | 5 |
| Slayer | Increases damage dealt to Passive Mobs. | Swords, Axes | Unique | 4 |
| Slingshot | Boost yourself into flight by right-clicking. | Elytra | Legendary | 3 |
| Smelting | Chance to smelt mined blocks. | Pickaxes | Simple | 3 |
| Smoke Bomb | When you are near death, you will spawn a smoke bomb to distract your enemies. | Helmet | Elite | 8 |
| Snap | Pull hit entity towards you. | Fishing Rod | Elite | 3 |
| Snare | Chance to slow and fatigue enemies with projectiles. | Bows | Elite | 4 |
| Sniper | Headshots with bows deal double damage. | Bow | Ultimate | 5 |
| Soulbound | A chance to keep item on death. | Weapons + Tools + Bows | Fabled | 3 |
| Soulgrind | Chance to get souls by killing mobs. | Swords | Fabled | 3 |
| Soulless | Increases damage dealt to Hostile Mobs. | Bow, Crossbow, Trident | Unique | 4 |
| Soulminer | Chance to get souls by mining. | Pickaxe | Fabled | 3 |
| Spark | Light opponents on fire. | Trident | Elite | 3 |
| Spiritmaster | Chance to get more souls from killing players. | Swords | Fabled | 3 |
| Spirits | Chance to spawn guard blazes. | Armor | Ultimate | 10 |
| Springs | Gives jump boost. | Boots | Elite | 3 |
| Strife | Increases Trident melee damage. | Trident | Legendary | 3 |
| Strike | Chance to strike lightning at the opponent. | Swords, Bow, Crossbow, Trident | Simple | 3 |
| Striker | Rain arrows over opponent. | Bow | Ultimate | 3 |
| Suspend | Chance to cause no knockback to mobs. | Swords | Elite | 3 |
| Swordsman | Chance to reduces incoming damage while wielding a sword by up to 22% at max level. | Armor | Ultimate | 5 |
| Tank | Chance to decreases damage from enemy axes by 2% per level. | Armor | Ultimate | 4 |
| Telepathy | Automatically places blocks broken by tools in your inventory. | Tools | Unique | 4 |
| Thunderlord | Strike monsters with lightning every 3 consecutive hits. | Weapons | Legendary | 3 |
| Timber | Chance to break a tree in one hit | Axes | Ultimate | 3 |
| Trench | Chance to break in 3x3 area. | Pickaxes, Shovels | Ultimate | 9 |
| Trickster | When hit you have a chance to teleport directly behind you opponent. | Armor | Elite | 8 |
| Turmoil | Chance to prevent opponents guards from spawning. | Armor | Legendary | 3 |
| Twinge | Make your enemy bleed, if hit using melee attack. | Trident | Legendary | 4 |
| Unbreakable | Tools with this enchant become unbreakable | Tools | Fabled | 1 |
| Undead Ruse | When hit you have a chance to spawn zombie hordes to distract and disorient your opponents. | Boots | Elite | 10 |
| Unholy | Defend with weakness and wither effects. | Armor | Legendary | 5 |
| Vampire | A chance to heal you for up to 3hp a few seconds after you strike. | Swords | Elite | 3 |
| Vein Miner | Mine entire vein of ores | Pickaxes | Elite | 3 |
| Virus | A chance of giving poison effect. | Bow, Crossbow, Trident | Unique | 3 |
| Voodoo | Gives a chance to deal weakness. | Armor | Elite | 6 |
| Ward | A chance to absorb enemy damage | Armor | Unique | 4 |
| Water Walker | Walk on Water. | Boots | Legendary | 1 |
| Wings | Allows flying when worn. | Boots | Legendary | 1 |
| Wither | A chance to give the wither effect. | Armor | Elite | 5 |
All Enchanting Items
Slot Increaser
Enchantment Orbs
White Scroll
Secret, Mystery and Magic Dust
Black Scroll
Randomization Scrolls
Item Nametags
BlockTrak
StatTrak
Soul Tracker
Transmog Scroll
Holy White Scroll
Mob Trak
Other Useful Commands
RPG Skills
Custom Fishing
Main Menu
Quests
Kits